Showing posts with label gluten-free. Show all posts

Friday, May 23, 2014

Don't Step on the Grass...

But no, not that grass in the lawn. And, no, not that either.

You may know it as asparagus, but come mid-May around here, it's simply grass. Hadley grass, to be specific. Hadley, on the rich floodplains just across the Connecticut River and hair north of here, is world-renowned for its asparagus. Or at least it was, up until the 1970s, when a soil-borne fungus more than literally decimated Hadley's asparagus production. In the decades leading up to that, Hadley farmers would pick and prepare up to 50 tons of asparagus each day of the fleetingly brief few weeks of the season. Hadley grass reportedly turned up in chic European restaurants and even at springtime feasts held by the Queen of England.

Although local asparagus production doesn't take on the epic proportions it did forty years ago, there are still a handful of asparagus farmers in full-scale production and many backyard growers with extra to sell. The town still takes pride in this element of its history, honoring the tender green spears with a major community festival and, I kid you not, an ice cream flavor. And, as it's an ingredient where freshness is especially rewarded, it's still worth trawling the back roads in Hadley and the surrounding towns this time of year for hand-written signs that simply read "Grass." Or, if you're me, quietly coveting the asparagus in the adjacent community garden plot and settling for taking many pictures of it and then buying a bunch from the stand just up the hill.

So, why simply grass? One variant, based on a folk etymology of the word, dating back to the 17th century, was sparrowgrass. The name held on until late in the 1800s, and, according to a 1791 pronunciation dictionary, calling it "asparagus" implied "an air of stiffness and pedantry." I can't say for certain why it stuck around here, but even aside from a desire to avoid stiffness and pedantry, it was grown in sufficient volume that it was almost as common as that grass in the lawn.

Asparagus being as versatile as it is and asparagus season being as fleeting as it is, I've been chowing through it every which way since the first local asparagus came in about two weeks ago. I was thinking of writing about asparagus and chèvre risotto or lemony shaved asparagus salad, but today's cool, rainy weather put me in a soup mood so I put together a creamy, smooth asparagus soup, accented with dried shiitake mushroom and white wine and topped with the asparagus tips, toasted with slivered garlic.

Creamy Asparagus-Mushroom Soup

gluten/grain-free, optionally vegetarian
  • 1 lb. asparagus
  • 1 onion, small dice
  • 4 cloves garlic
  • 6-8 dried shiitake mushrooms
  • 1 Tablespoon butter
  • 1 teaspoon olive oil
  • 2 teaspoons salt
  • 1¼ c. dry white wine
  • ½ c. cream
  • 2 c. chicken or veggie broth
You have two options with the dried shiitakes: you can grind them up and add them as a powder, or you can simmer them in the stock until they're soft enough to blend. If you're simmering them in stock, start that first. Break up the mushrooms coarsely with your hands and put them in a small saucepan with the broth and bring up to heat over medium-high heat. The mushrooms will need to simmer for at least 15-20 minutes to soften. If grinding them up, run them through a spice grinder until fine and set aside.

Dice onion. Melt butter with olive oil in a large saucepan over medium-low heat, then add onion, stirring occasionally. Meanwhile, peel and mince two cloves of garlic and prep the asparagus. Snap off both ends of the asparagus (this is a good job for earnest helpers of all ages and abilities). If you're running short on time, you can cut off the top and bottom inch of the spears in one fell swoop. Scrap the cut ends, but put the tips aside to put on top later. Cut the stalks into pieces about an inch long.

Once the onion has started to get clear and soft, add the garlic, salt and asparagus. Stir until the garlic gets fragrant, then add a cup of wine. If simmering mushrooms, add the mushrooms and broth, too. If using ground mushrooms, whisk with the stock and add to the pot with the asparagus. Let simmer until the asparagus is soft, 10-15 minutes, add the cream and remaining wine, then blend until smooth.

Sliver the other two cloves of garlic and saute in a little olive oil with the asparagus tips and salt and pepper. Serve soup with garlicky asparagus tips on top.

Sunday, April 13, 2014

Tortilla Soup: Great Sick Food or Greatest Sick Food?

In 2000, Dr. Stephen Rennard of the University of Nebraska set out to design a study to examine if and how chicken soup might actually help people suffering from the common cold. In the study he started with his wife's recipe, handed down from her Lithuanian grandmother. Results from Rennard's study suggested that chicken soup may actually help fight colds by inhibiting the movement of a particular type of white blood cell that defends against infection. Rennard's team (and other scientists who have replicated the study since then) found similar results with other chicken soup recipes as well, though they couldn't identify which ingredients were key to the soup's immuno-supportive qualities. You can see Dr. Rennard's article, Grandma's recipe and some adorable pictures of him and his wife cooking soup together at the University of Nebraska Med. Center website.

When I ended up with a cold a couple weeks ago, I had very little energy, a fridge full of forlorn, half-eaten rotisserie chickens, and a craving for spicy food. There are always a few roast chickens languishing in the fridge; most weeks, Tom takes full advantage of the Friday two for $10 deal on them at the local supermarket, eats the breast (at least most of it) and then leaves them in the fridge. I'm not too big into plain roast chicken, but I hate letting something like that go to waste (my generalized guilt about wasting food is multiplied when an animal died to become that food), so I am constantly trying to find ways to sneak this leftover chicken into things. In this case, spicy chicken soup provided the answer to all of these queries.

I used tortilla soup, a chile-spiked, chicken-based soup with origins across Mexico, as a jumping off point. I spent a while curled under a blanket with a box of tissues and the laptop reading many recipes for inspiration. This recipe might take a little while, but it's one where there's not a whole lot of active time, which means there's time to stop and take a nap between steps. You may not have all of the ingredients that I did (nor the plague of half-eaten chickens) so for many of the ingredients here, I provide a few alternatives.

In the end, what I came up with was good enough to eat for several more days without getting bored and to make again even when I wasn't sick.

Chile Chicken Soup

gluten-free, dairy-free, optionally grain-free

    Ingredients:

  • 2 half-eaten rotisserie chickens (You can use 1-2 lbs of fresh/frozen chicken and simmer in 2-3 qts of chicken stock instead of water)
  • water to cover (3-4 qts)
  • 2 tsp. light-flavored oil
  • 2 small-medium onions
  • 8 cloves garlic
  • 6 Dried Anaheim chiles, toasted* (or about ¼c. paprika, see note about chiles)
  • 2 chipotle chile (or 1-2 tsp. chipotle powder, scaled to taste, or ½-1 tsp. cayenne)
  • 2 tsp. ground cumin
  • 2-3 bell peppers, fire-roasted (I used a combo of red bell and cubanelle)
  • 1/2 can crushed tomatoes
  • salt to taste
  • handful cilantro
  • 2 T masa harina made into a slurry with about 1/4 cup water, stirred in close to the end (optional, adds body)
*About Chiles I used California Anaheim and chipotle peppers. California Anaheims are milder than the already fairly mild New Mexico Anaheims. I buy them in a big bag as "California Chiles" at my local international market. They add a lot of rich chile flavor with virtually no heat. That's (part of) what the chipotles are there for. Chipotles are smoke-dried jalapeño peppers and add both heat and a rich, smoky flavor. I'd actually prefer to use a blend of these with dried pasilla chiles (also called chile negro), which are somewhat spicy and have a slightly darker flavor, but I didn't have any on hand. Anchos (dried poblanos) would also be good here. Additionally, you can replace these with about ¼ cup sweet paprika and about ½ tsp. of cayenne.

    Topping suggestions:

  • tortilla chips (if you want to be fancy, fry your own tortilla strips)
  • avocado
  • lime
  • more cilantro
  • sour cream
  • shredded jack, cheddar or queso blanco cheese
  • chili sauce

Before we get started, let me introduce you to my spice grinder. This is one of my best friends in the kitchen. It's not that I'm a fresh-ground spice purist (I'm not), it just allows for so many more options: getting to make chili powder out of whichever dried peppers I like, pulverizing the dried shiitake mushrooms I like sneaking in all over the place, not having to buy both whole and ground versions of spices I use in both forms. Yes, it does say über super coffee grinder on the side. You can buy devices labeled "spice grinders" but many comparisons I've seen say you're better off with a small, blade-driver electric coffee grinder unless you are regularly grinding very large quantities. Additionally, little coffee grinders are cheap. You can reliably buy them new for under $20, commonly find them at thrift stores or tag sales for <$5, and sometimes find them for free at the dump swap shop, if you are lucky enough to have such a thing, or from someone who is moving, giving up coffee, or getting rid of it for some other reason. I used to have two, one for coffee and one for spices, but the one which had served as spice grinder for nearly a decade gave up the ghost this winter, so the coffee grinder got promoted.

On to soup, though. If you're using leftover roasted chicken(s), break apart chicken carcasses just enough so they fit in stockpot well. Leave any remaining meat intact. Add any languishing veggies (got half an onion? some sad, floppy carrots? half a shriveled beet? throw them in!). Add water to cover, simmer for 1 hour, let sit for 1 hour, then pick the meat off of the bones (it will fall off). I find that with 4 quarts of water, I end up with about 2½ quarts of stock with the evaporation that happens. Sometimes I cook the stock down a little further. If you are using fresh meat, pour about 2 qts of stock over 1-2 lbs chicken and simmer for about an hour and sit for about an hour. Either way, strain the chicken over a bowl shred the meat with your fingers or with two forks if it's too hot to handle. Add the chicken to the reserved stock or the other way around, whichever fits better, to use the stockpot to get the next part ready.

Next, roast the sweet peppers. If you have a gas range, you can put the peppers right on the burner grate over a medium flame and turn every minute or so until the outside is blistered, peeling a little, and has some lovely blackening on the skin all around. Then, place them in a covered dish so they can finish steaming from within. If you have an electric range, you can check out some of the suggestions offered here. You can also elect to simply chop up your peppers and cook them with the onions and garlic, but roasting them brings out their sweetness and adds the depth that only light charring can bring.

Dice the onions, slice the garlic, cook in light-flavored oil in stock pot over med-low heat, stirring frequently until well-browned and tasty smelling. Add non-chile spices to onion/garlic and stir until fragrant. Take a handful of cilantro, cut (but keep!) the stems. Finely chop the stems and roughly chop the leaves, then add to the onions, garlic and spices, then return chicken + broth to pot.

If using whole chiles, toast them over the stove as well. Either grab them with tongs one at a time and wave them over the flame until they get fragrant and a little puffed or toss them in a dry cast-iron skillet over medium-low heat until a similar effect is achieved. Tear them up, remove the stems and grind. I can only fit one or two in my grinder at a time, so it takes a few batches. I just dump them right into the pot as they come out.

Take stems & seeds out of the sweet peppers, if you didn't add them with the onions and garlic. Either chop them finely or run them through food processor. Add chopped peppers and crushed tomato to soup. A nice, but not essential touch here is to take a few tablespoons of masa harina (the specially-treated corn flour used for making tortillas), mix with some water and add the the soup. It gives the soup a hearty, satiny body, but it's not worth buying masa harina just for this. The soup will be plenty tasty without.

Adjust the seasoning. I usually serve with some assortment of tortilla chips, fresh cilantro, avocado cubes (don't skip these!) and lime wedges. Other people reportedly like adding sour cream or shredded mild cheese. Regardless, let diners add their own flair. As much as the tortilla bits give the soup its name, it's pretty good without them, too, if you don't have them or aren't eating corn for whatever reason. I also like to put out some chili sauce, so that diners can adjust the spiciness to their liking.

Thursday, May 9, 2013

Curried Tempeh with Mustard Greens and Cellophane Noodles

I'll be perfectly honest: I didn't like tempeh as a kid.

In fact, early experiences with tempeh meant that I didn't give it much of a chance again until about a year ago, but, boy howdy, am I making up for lost time.

Tempeh is a protein-rich food made from split soybeans and, sometimes, a variety of grains which have been parcooked and innoculated with Rhizopus oligosporus, a type of fungus, and incubated for 24-48 hours. The culture partially ferments the legumes/grains, making them easier to digest, and binds them together into a firm cake with a mild flavor somewhere between nuts and mushrooms. It can be sliced or crumbled and holds up to grilling or stir-frying. Most tempeh is gluten-free, but, if you're concerned about that kind of thing, it's important to read the labels on multigrain tempehs, which vary in contents, but sometimes include gluten-bearing barley or rye.

In its native Indonesia, it's very often served fried or grilled, often with some kind of lightly sweet & spicy accompaniment. Peanuts turn up with it a lot too. For me, I've found that I still don't fancy the taste of plain tempeh - despite liking nuts, mushrooms and tempeh - but that sauteéing it until it's a little crispy with some salt or soy sauce makes a world of difference.

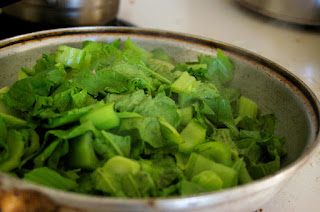
Recently, I've been cooking it up in a spicy-sweet stir-fry with mustard greens, largely inspired by this South Indian take on tempeh from Delectible Victuals, with the addition of a generous helping of fresh cilantro, including the stems. It's good over rice, but it's great tossed with thin cellophane noodles, made from mung beans and also gluten free (available at Asian markets - rice vermicelli is a good, slightly more common replacement and any other thin, clear noodle would work). If you want to serve with rice or bread, you can simply omit the steps in the recipe below involving the noodles. It's also at least as good cold the next day.

Curried Tempeh with Mustard Greens and Cellophane Noodles

vegan, gluten-free (depending on tempeh, soy-sauce)
Ready in about 30 minutes, serves 2-3
  • 1 small-medium onion, small dice
  • 2-3 cloves garlic, minced
  • ½ red bell pepper, medium dice
  • 1-2 tsp. light-flavored oil
  • 1 tsp. ground turmeric
  • handful cilantro
  • soy sauce
  • 1 Tblsp. sugar
  • 1 8-oz. package tempeh, crumbled
  • thick chili sauce, like sambal oelek or sriracha, to taste (start with 1-2 tsp.)
  • 1 good sized bunch mustard greens or other medium-weight green like swiss chard, sliced into 1" ribbons
  • about 4 oz. dried cellophane noodles - in the packages I get, this is two bundles
  • crushed peanuts (optional)
Start by putting the noodles in a bowl of warm water to soak, which is all the precooking they need. They will need to soak at least 15 minutes. Prep the veggies and crumble tempeh coarsely. Cut off the bottom half of the cilantro stalks. Set aside the leafy end for later and mince the stem end very small.

Heat a large wok or skillet over a high heat. Add a teaspoon or two of oil and swirl to coat. Add tempeh and a teaspoon or two of soy sauce. Cook until tempeh becomes browned and a little crispy. Set aside and try not to pick at it too much. Wilt the greens slightly in a separate pan with a tight fitting lid by putting on medium-low heat with a tiny bit of water in the bottom. The greens will reduce in volume by at least half.

Add a little more oil to the wok or skillet and add the onions, garlic, bell pepper and minced cilantro stem. Saute until the peppers and onions get a little color, then add the turmeric and sugar. Add the tempeh and chili sauce. Drain the noodles, then add the wilted greens and noodles to the wok or skillet. Toss to combine. Remove from heat and toss with roughly chopped cilantro leaves. Adjust soy sauce, chili and sweet levels as desired. Serve with optional crushed peanuts on top.

Saturday, January 19, 2013

Aloo Mattar Deconstructed (Or, one more thing to do with mashed potatoes)

I'm always interested to hear from people if they have, historically, been food separators or food mushers. Food separators are those who observe strict boundary lines between food on their plate; they may go so far as to reject those impure motes of food which may have absorbed traces of the others. Food mushers, on the other hand, tend to take a more integrative, Gestalt approach, seeing divisions between the food on your plate as totally constructed and unnecessary, swirling it all into a cohesive whole.

Kids tend to be much more hardline about their separation/mushing practice, though it is certainly not limited to young folks. Interestingly, despite any value judgment I may have implied in my descriptions, I know great cooks who grew up in each camp. It truly is interesting to see how it's an indicator of one's approach: Separators tend to take a more measured, scientific approach. They're more likely to do careful research before cooking, even if they're creating a new recipe. You want one in your kitchen the day you get that perfect first bunch of asparagus in the spring. Mushers tend to play a little more fast and loose in their recipe creation, coming up with uncanny combinations on the fly and making the most of what's at hand and reimagining ingredients. You want one in your kitchen when you have a fridge full of leftovers that need to get used up.

That said, this one goes out particularly to those other folks who ever got excited about swirling together mashed potatoes, peas and ketchup. Doubly for anyone who would add hot sauce.

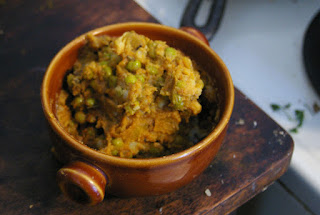
Aloo Mattar is a hearty North Indian dish featuring potatoes (aloo) and peas (mattar) in a spicy, tomato-based sauce. I first made this on a cold, damp day I really wanted mashed potatoes, much more than I wanted rice or flatbread, so I pulled the recipe apart so as to put the curried peas over the potatoes. Since then, I've used the curry over mashed potatoes idea in a few other ways, but this is still my favorite. It also leaves broader possibilities for using the leftover mashed potatoes.
The dish comes together quickly (I've done it in less than 30 minutes), is vegetarian, and could easily be vegan: make whatever mashed potato recipe you like, and omit or replace the (sour) cream. You can even make your own: one of my vegan friends swears by this recipe for cashew sour cream.

Aloo Mattar, Deconstructed

vegetarian, gluten/grain-free, easily veganified
serves 4, start to finish in 30 minutes.

    Super-Basic Mashed Potatoes

  • 5 med.-large potatoes
  • 1-2 tsp. salt
  • 2 T. butter
  • 1/4 c. milk

    Masala Mattar

  • 6-7 cloves garlic, finely minced
  • 1" piece ginger, peeled and finely minced
  • 2 c. tomato puree (about ⅔ of a 28 oz. can)
  • 1 tsp. red pepper flakes
  • 1 med. onion, med. dice
  • ½ T. butter
  • ½ T. oil
  • 1 2" cinnamon stick (if you don't have it, add another tsp. of ground cinnamon later)
  • 2-3 cloves
  • 2-3 green cardamom pods
  • 1 tsp. cumin seeds
  • ½ tsp. methi (fenugreek) seeds (optional)
  • 2 tsp. turmeric
  • 1 tsp. salt
  • 1 tsp. cinnamon
  • 1 lb. (3½-4 c.) frozen peas
  • ¼-½ c. light cream or sour cream
  • fresh cilantro

  • Start with the mashed potatoes. You can use whatever mashed potato recipe you like, but this is a good basic one. It's just a base, anyway. Wash potatoes and slice into chunks about ½ to 1 inch large (you can peel them, if you prefer). Place in a large saucepan, cover with water and add about a tsp. of salt. Cover with a well-fit lid and bring to boil over high heat. Let boil until potatoes are fork-tender, then add butter, milk and salt to taste as you mash. I don't like mine perfectly smooth, and find that having some intact pieces of potato helps back this as an interpretation of aloo mattar, but it's up to you.

    I made the whole peas thing in my cast iron dutch oven, but this would also work in a large, heavy-bottomed saucepan.

    First, prep the garlic and ginger. You have two options here: you can chop them roughly, then throw them in the food processor with the tomato and red pepper or you can mince them both finely and add them at the same time as the tomato.
    Put your large, heavy-bottomed pan over a med-high heat and start toasting the whole spices: the cinnamon stick, cloves and cardamom. let them get fragrant but don't let them burn. Add the butter/oil, cumin and methi (if using) and stir/toast until the cumin seeds get sizzly and fragrant. Add the onion and let it cook for 2-4 minutes until it starts to soften. Add the turmeric, ground cinnamon, peas and tomato/garlic/ginger/chili mixture. Let simmer for 5-10 minutes, then add cream or sour cream and cilantro. Adjust salt/spicy to taste and serve over mashed potatoes.

Sunday, November 18, 2012

Everyone Wants a Piece of Falafel

Falafel is kind of a beloved sore spot in the pervasive Palestinian/Israeli culture war. 2005's Oscar-winning short film, the comedic musical West Bank Story imagines the feuding parties of its source material as competing falafel joints: the Jewish-run Kosher King and the Arab-run Hummus Hut. When Larissa Sansour and Oreet Ashery, British-based artists of, respectively, Palestinian and Israeli origin, put together a project to examine the Israeli adoption of Palestinian culture and where the line between adoption and appropriation lies, they conducted it through interviews in London falafel restaurants and named it Falafel Road.

In fact, taking it back a step, you could probably teach an engaging and fairly comprehensive course in the history of the Middle East based entirely on the chick pea. Although some archaeologists speculate that the legume in question was first tamed by people living in northern India, the oldest archaeological evidence of cultivated chick peas comes from Tell El-Kerkh, in Syria, which date to the late 10th millenium BCE. The oldest evidence of the chick pea in Israeli/Palestinian territory dates to only about 1500 years after that (still over 10,000 years ago), at a site near Jericho in the West Bank.

However one might wish to, you can't infer falafel from the presence of chick peas, and foods like that don't preserve as well over time as dry beans (partially because that would require leftovers). So we'll skip ahead just a little to another important event in the history of falafel: the foundation of the state of Israel in the mid-20th century. A large influx of people and a shortage of meat pushed cheap protein like beans to the forefront for everyone in the region. Joan Nathan, author of Foods of Israel Today credits the contemporary, chick pea-based form of falafel to Yemeni Jews. Nathan claims that local falafel recipes in the pre-Israeli period tended towards a blend of chick pea and fava bean (also called broad
bean), as do many Lebanese falafel recipes. The local push away from fava beans, she argues, came as a result of Kurdish and Iraqi Jewish immigrants, many of whom suffered from favism, a serious, genetically-based enzyme deficiency that makes fava bean consumption (among other things) cause severe anemia. Local Palestinians claim that the only change to falafel is the Israeli flag on a toothpick stuck in it. Aziz Shihab, the Palestinian-American author of the cookbook A Taste of Palestine, wrote to a falafel-slinging Israeli restaurant in the States, "This is my mother's food, this is my grandfather's food. What do you mean you're serving it as your food?" Interestingly, yet a third claim on the provenance of falafel maintains that it was developed by Coptic Christians in Egypt for Lent, during which many Christians traditionally abstain from eating meat. Egyptian falafel, which they usually call tamiyya, is typically made entirely from fava beans rather than chick peas. Susan Molthen, executive chef of Bay Area Egyptian restaurant Al-Masri says, "Every region, city or country in the Middle East has it, but it's all derivative; they put their own spices and flavors into it."

I'm not going to try to make any conclusive claims about who originally invented the falafel; food is an artistic pursuit that demands an essential tension between the established and the subtly innovative and at the same time is a projection of culture deeply tied up in people's sense of identity. The truth is that it belongs to all of these people, but that their attachment to it doesn't make it belong to the others any less. It's yours if you make it, too, but significantly more so if you start with a bag of chick peas than if you start with a box of falafel mix. Because all of the many claimants can agree about that being an abomination.

The process isn't hard, given a little forethought and a food processor; it requires overnight soaking of dry chick peas (or at least several hours), but the process from there amounts to throwing everything in the food processor and buzzing it into a grainy paste, rolling it into balls and, finally, frying them. Deep-frying is traditional, but you can squash them into patties and pan-fry, too. Beyond that, all it requires are a few accoutrements: flatbread, fresh vegetables and tahini sauce. I also included some pickled radish after reading a number of recipes that suggested pickled vegetables, most commonly mango or turnip. Additionally, you can freeze the mixture uncooked, after rolling it into portioned balls: lay raw falafel on a cookie sheet lined with waxed paper or plastic wrap, cover lightly and freeze until the falafel is frozen enough to hold its shape. Transfer to a freezer bag, then pull out a couple at a time as you want them.


Falafel

vegan, optionally gluten/grain-free
makes 15-20 falafel
  • 1 cup dried chickpeas, soaked
  • ½ large onion or 1 small onion, roughly chopped (about 1 cup)
  • ¼ c. rough-chopped fresh parsley (a small handful)
  • ¼ c. rough-chopped fresh cilantro
  • 1 tsp salt
  • ½-1 tsp. red pepper flakes
  • 4 cloves of garlic
  • 1 tsp. ground cumin
  • 1 tsp. baking powder
  • 4-6 Tblsp bulgur* (optional)
  • oil for frying (I fry in ½-1" peanut or canola oil in a cast iron skillet on med. high heat)
  • *Gluten/grain-free advisory: Bulgur is a wheat product. It adds a really nice texture and is nominally there to aid in binding the falafel, but many traditional recipes are totally grain free, so feel free to omit this if you don't eat it or simply don't have it.

To soak the chick peas, you can either set them up the night before or start an hour or two before you want to serve. Put the chick peas in a large bowl or pot and cover with 2-3 inches of water. You can let them sit overnight or bring them to a boil for 2-3 minutes, turn them off and wait an hour or two. I've gotten better results with the overnight soak, but the expedited soak works fine if you decide you need to eat falafel today and give a far better result than canned, cooked chick peas.

Drain and rinse chick peas, prep ingredients as indicated and grind in food processor to a grainy paste. Roll into balls about 1½ in. in diameter (may require squeezing to hold together). Heat oil in pan over med-high heat until a little water sizzles and pops aggressively and put as many balls of falafel as you can at one time into the pan. I typically use my smaller, 8" cast iron skillet to do this. It fits 8 or 9 at a time, as they can be pretty close together, and uses up a lot less oil than do the larger pans I usually think of first. Fry until deep brown on one side, then turn. Drain on newspaper or paper towel. You can also put in just enough oil to coat the bottom, flatten the balls a little and fry them that way. It's not quite the same, but somewhat more practical if you're only frying up enough for one or two people.

The Sides

yogurt-tahini sauce:

  • 1 c plain greek yogurt (used 2% milkfat)
  • 1/4 c. tahini
  • 1 clove garlic, finely minced
  • 1 T lemon juice
  • 5-6 mint leaves, minced
  • 1/2 tsp. cumin
  • 1/2 tsp salt
  • 1/4 c. water

Tahini Sauce:

  • 1/4 c. tahini
  • Zest & Juice of 1 lemon (or 3-4 Tblsp. bottled lemon juice)
  • 1/4. c. water
  • 1/2 tsp. Salt
  • optional:
  • ½ tsp. hot smoked paprika
Both of these also make great vegetable dips. In fact, it's worth cutting up some extra veggies and putting them out with the sauce for diners to munch on while they're waiting for their falafel.

Wednesday, November 7, 2012

Butternut, Coconut, Curry-nut?

Apparently, this has turned into the squash blog. Realizing this would be my third subsequent squash post, I almost posted about something else. However, the following things occurred to me:
  1. These are three quite different squash recipes, illustrating the versatility of the vegetable.
  2. Who would come here who doesn't want to hear more about squash‽
In my last post about squash-filled profiterole, I went on, possibly at too great a length, about why roasting a bunch of squash and keeping it in your fridge is a fabulous idea. I won't repeat myself, but it is; consider this recipe Exhibit B in the case. A rich, satisfying dish that balances sweet and savory, this contains a complete protein when you add rice and happens to be vegan, gluten-free and nut-free (the coconut, despite its name, does not affect those with tree-nut allergies).

As long as you already have roasted squash, this curry comes together in no time flat - about 20 minutes at the outside. Although I sometimes recommend forgetting to start the rice until well into cooking a dish to give you an incentive to let something simmer longer, this is a dish where you want to make sure to start the rice ahead of the other dish so you won't end up waiting on the rice.

I used a smallish (probably 2-3 lb) butternut squash for this dish, but other varieties of winter squash will also work. To roast squash, halve it, scoop out the seeds and place on a lightly oiled (foiled if you don't want to scrub) baking sheet. Bake at 375° for 35-60 minutes. Check at 30 minutes and poke the squash at its thickest part, then estimate how much longer until it's tender or check every 5-10 minutes.

Squash, Coconut & Chickpea Curry

vegan, gluten-free, nut-free
Takes about 20 minutes, serves 3-4
  • about 2 lb winter squash, roasted and cut into 1" cubes
  • 1 onion
  • 3 cloves garlic
  • 1 tsp brown mustard seed
  • ½ tsp. fenugreek seed
  • 1 tsp. cumin seed
  • ½ tsp. turmeric
  • ½ tsp. coriander
  • ½-1 tsp. red pepper flakes
  • ½-1 tsp. salt
  • 1 15 oz. can chick peas, drained
  • 1 can coconut milk
In large, heavy bottomed pot, heat a few teaspoons of veg. oil over high heat. Add mustard, fenugreek, cumin and coriander. Once the seeds start to sizzle and pop, add the garlic and onion. Once onion has started to soften and brown a bit, add chick peas, turmeric, red pepper and salt. Toss, then add squash and coconut milk. The squash will start to break down and blend into the coconut milk, making for thick, saucy goodness. The squash shouldn't totally dissolve and dissappear, though.

Simmer for a few minutes, adjust seasoning and serve over rice. Cilantro is also nice addition right at the end, too.

Tuesday, October 16, 2012

Garlic & Proust: How to Find Out Who Your Real Friends Are

It is plain that the truth I am seeking lies not in the cup but in myself.
—Marcel Proust, In Search of Lost Time

Don't underestimate the importance of messy, imprecise and sometimes smelly personal rituals like garlic spaghetti. It's difficult to get out of the mindset of ritual being the province of traditional religion; after all, it does share a root with the word rite. But if you take it back even farther, it also shares a root with rhythm, which makes at least as much sense: ritual has as much to do with the beat, the repetitive, familiarly measured flow of action.
It's a way of connecting with personal history, enlivening more abstract, nebulous memories with the more immediate, classical five senses. If nothing else, it's vastly more productive and less creepy means of reminiscing than many others. Proust famously wrote about this phenomenon in In Search of Lost Time, describing and then attempting to deconstruct an inexplicable bliss that came out of eating a bite of madeleine soaked in lime-blossom tea, finally attaching it to time spent with his aunt as a child.

Imprecise memories don't necessarily require precise remembrance. I first learned about garlic spaghetti from a college friend. Our relationship was largely based around cooking together: we lived in the same vegan co-op, worked at the same (non-vegan) restaurant off campus, and found (sometimes invented) plenty of reasons to be hungry and cook together outside of that. To be quite honest, most of my memories of this friendship are messy and smelly, but they're also distinctly delicious.

Garlic spaghetti was a family favorite of his: thick pasta coated in a buttery Parmesan sauce loaded with raw garlic. It may be vegetarian, but health food, this ain't. It started out innocently enough. We'd peel up 4-5 cloves of garlic for a pound of pasta. It was garlicky, but still fairly accessible. However, we had some sort of ongoing need to out-badass the other, and so every time we made it, the garlic content went up. We made this about once a week. By the time I got to making it for my family back home during Winter Break, it had gotten to a point where we were using at least a full bulb of garlic for the two of us. My family thought I had totally lost it and were ruined on the dish, despite being people who like garlic fairly well.

I made it for the first time in several years the other day. My sister and I had, coincidentally, both been thinking about it. I made the sauce with 5 cloves of garlic for the two of us, staying on the conservative side, but wondering how my own tolerance had slipped from the full-bulb dragon-breath days. I thought it could have used a little more garlic.

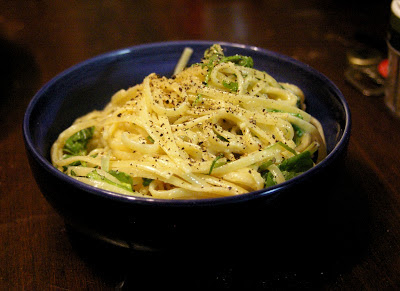
If you aren't willing to use at least a clove of garlic per person, don't bother. Remember, though, that garlic breath is only a problem for those who don't have it. The friend from whom I learned this dish insisted it was best served with fake bacon bits, and further insisted that they were preferable to real bacon in this case. I don't know that it holds for me, but Bac-Os (or their generic Head Nut-bought equivalent) were an essential piece of the garlic spaghetti ritual in college, and I would be remiss not to mention them. Here, I've tossed some fresh arugula with the hot pasta, letting it wilt gently into the dish, which is an entirely different but, but still nice, touch.

And fear not the leftover garlic spaghetti! For there do you stumble upon another piece of the ritual: the leftover garlic spaghetti omelette. It pretty much explains itself.


Garlic Spaghetti

vegetarian, optionally gluten-free
serves 3-4, takes 30-40 minutes start to finish
  • 1 lb spaghetti (this is the only ingredient with gluten: gluten-free pasta = gluten-free dish)

  • Sauce

  • 4-5 cloves garlic
  • 2 Tblsp. butter, room temperature
  • 1 egg (if you double the recipe, still use 1 egg; 3 or more times the recipe, increase egg)
  • ½ c. good grated Parmesan
  • 1-2 Tsp olive oil

  • Optional accoutrements:
  • fresh ground black pepper (I lied, this is obligatory)
  • fresh arugula or spinach
  • bacon bits, fake or otherwise
  • red pepper flakes, if it isn't hot enough for you already (in the badass times, this was a common addition)

Start by putting the pasta water on to boil. Peel the garlic cloves, grate cheese if necessary. Add ingredients to food processor or blender in the order listed, drizzling in the olive oil last, in a thin stream. The sauce will have a thick, fluffy, almost mayonnaise-like consistency. It is also excellent as a spread on bread, and pairs really well with broccoli.

When pasta is cooked, strain and toss with sauce and fresh greens, if using, until pasta is well-coated and greens are slightly wilted. Serve with black pepper, bac-os, or whatever else appeals to you.

Monday, October 8, 2012

Quick Hits: Chile-Lime Winter Squash/Sweet Potato

It's that time of year where I fall in love with my favorite orange vegetables again - winter squash and sweet potato. Last year, my CSA farm's winter squash crop was drowned by Hurricane Irene. This picture to the right was taken in the squash field. From a kayak. The squash are under about 12 feet of Connecticut River.
They did find their princess in another castle, though, taking in their best sweet potato crop ever from a field a little farther away from the river. In many recipes, this one included, the two are interchangeable. They have very similar nutritional profiles, as well. They're both extremely high in Vitamin A (as are most orange vegetables) and very good sources of Vitamins C, B6, potassium and fiber.

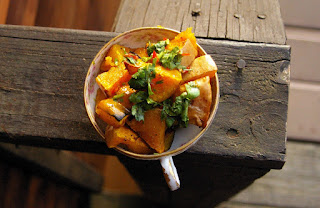
This simple but striking presentation, dressed in sweet, tart and spicy, works equally well for either. Butternut squash is an excellent choice for a dish like this; it's fleshy and its thin skin means it doesn't need to be peeled, just well washed, before being cubed and roasted. Delicata's another good sweet, thin-skinned variety but have a lower flesh-to-seed ratio than butternut. You can eat the rind of any squash, but with many of the thicker-skinned squashes, like buttercup/kabocha, pumpkin or hubbard, you don't want to.

Chile-Lime Squash/Sweet Potato

vegan, gluten/grain-free
done in about 30 minutes, serves 4 as a side
  • 1 large butternut squash, cut to bite-sized wedges
  • or
  • 2 medium sweet potatoes, cut into bite-sized pieces
  • 2-3 Tblsp. olive oil
  • ½ tsp salt
  • 1 tsp cumin
  • 1 tsp cinnamon

  • Dressing:

  • 1-2 T honey
  • zest & juice of one lime
  • ¼-½ tsp. ground chipotle pepper
  • or
  • 1-2 canned chipotles, minced
  • or
  • 1 small red chile, minced
  • some fresh cilantro (optional), roughly chopped

Toss squash with olive oil, spread on sheet pan and sprinkle with salt, cumin, cinnamon. Bake at 450°F for about 25 minutes, turning once. Remove from oven and toss with dressing and cilantro

Saturday, September 29, 2012

Quick Hits: Herb Garlic Parmesan Potato Wedges

A sure sign of fall: potatoes are back! Boil 'em, mash 'em, stick 'em in a stew! Perhaps the biggest source of the potato's meteoric rise to culinary ubiquity in Europe has to do with how little need be added to reach being comfort food: little more than heat, salt and maybe butter. You can definitely add more (see last fall's breakdown of Potato Gnocchi with Leek, Kale & Sage Butter), but, as demonstrated by the recent excitement about Waffle-Iron Hashbrowns, the spud requires little help past heat.

Here, cheese and garlic help play up the warm, toasty potato goodness, adding a flavorful crustiness to a simple roasted spud.

Herb Garlic Parmesan Potato Wedges

vegetarian, gluten/grain-free
serves 4-5, about 30 minutes, start to finish
  • 3 lbs potatoes (red ones are nice, but not essential)
  • 2 T olive oil
  • 1 tsp salt
  • Topping:

  • 4-5 cloves garlic, minced
  • 6-10 sprigs thyme (or about 3-4 T)
  • fresh ground black pepper
  • ¼ c. grated parmesan cheese
Preheat oven to 450°F.

Cut potatoes into wedges (6-8 per spud) and toss with olive oil. Spread on sheet pan and sprinkle with salt and pepper. Bake wedges for 10-15 min.

While wedges are roasting, mince garlic and mix with other topping ingredients. Turn potato wedges, sprinkle with topping, and return to oven for about 5 minutes.

Sunday, September 23, 2012

Mole Gringo, with only a dozen(ish) ingredients

Reading about traditional moles makes me feel like a total poser, but it also makes me hungry. My students are currently reading What the Moon Saw, a thinly veiled ethnography of a rural village in the southern Mexican state of Oaxaca, for another one of their classes. I snagged it to read one day last week in the name of integrated curriculum and devoured it more or less in one sitting, give or take snacks. Oh, YF books, you go down so smooth. It is also a fairly good coming-of-age story about a teenage girl from the burbs of DC meeting her Mexican grandparents for the first time, finding out her grandmother is a curandera (shamanistic healer), and falling for a local boy who sings revolutionary songs real pretty. Moles, though never mentioned by that name are, along with hot chocolate and corn tortillas, essential to the story. In one of her grandmother's stories, a friend recalls a situation in which she planned on killing herself, but decided to make chicken with chocolate-chile sauce as a final meal and decided life was worth it after all. Mole proved to be her reason to keep living.

The word mole comes from a Nahuatl word, molli, which simply means "sauce," though it lines up interestingly with the direct-from-Latin Spanish verb moler, "to grind," an essential process in making mole. Nahuatl, a group of
languages from across southern Mexico, is the source for a surprising number of English words: chocolate, avocado, guacamole, tamale, chili, coyote, and tomato are all of Nahuatl origin, filtered through Spanish. Seeing as the term of origin is as broad as it is, it's unsurprising that there are a wide variety of moles across southern Mexico. They vary in complexity and focus, but have a few things in common: all begin with a variety of chiles, and from there are built out of spices and ingredients that make it sweet, like dried fruit; sour, like tomato or tomatillo; and thick, like nuts, seeds and starch. Oaxaca, where the book takes place, is known in some circles as the "Land of Seven Moles" but it's much broader than that - think of the seven moles a little like the five classic French mother sauces. They're more like guidelines. The most complex of these moles have nearly 40 different ingredients and can take days to make, so it's easy to see where folks might be overwhelmed by the idea of making it on their own for anything short of something very special, and miss out on the joys still available from a simplified mole.

Sunday, September 9, 2012

Chocolate Magic Cookies (gluten & dairy-free)

One of my early jobs in education was as a paraprofessional in an intensive special needs program. A number of the students with autism were on the gluten- and dairy-free Autism Diet, which purportedly ameliorated some of the regressive behaviors associated with the Autism Spectrum. I had—and continue to have—reservations about the effectiveness of this approach, but I'm neither an autism specialist nor a nutritionist, so it's not really up to me, and I don't think it's going to exacerbate the issue. However, I had one co-worker who insisted on calling it
the "fun-free" diet in a way that I found aggravating. The "fun-free" description seemed to riff on the infuriating, pervasive illusion that if something is good for you, there's no way it will taste good and its equally problematic corollary that if food tastes good, then there's no way it's good for you.

Similarly, there's this illusion about teachers that they can either be nice or demanding, and that only one of these qualities is effective. I remember reading one article which contrasted "the kind of teacher who brings in brownies" with "the kind of teacher that demands results." Seriously, who comes up with this festering load of flapdoodle? I bet it's the same people that think tasty and healthy are mutually exclusive. This isn't to say that there aren't teachers who mistake being liked for being respected, and end up foregoing academic rigor for fear of not being liked, but let me tell you this: brownies—or any other kind of food—have nothing to do with it. On the other side of it, there are also teachers who mistake being disliked for being respected, and brownies have nothing to do with that either.

Any time you share food with someone, it's an acknowledgement of your shared humanity. Even if it's just passing around a tin of Altoids, as a couple teachers I've had were fond of doing, you are demonstrating a simple need and enjoyment that you have in common. Beyond demonstrating that you're not a robot who sleeps standing up in the broom closet, you are breaking down the perceived otherness that keeps students from becoming invested in a subject. Even in a fairly concrete, objective topic like math, a student's ability to invest themselves in a topic, to work hard and internalize it is linked to their sense of being seen as a person. So yes, I am one of those teachers who brings edible treats in for my students on occasion. I am also one of those teachers who demands a lot of hard work. I see no conflict between these.

This year, I have several students with dietary restrictions, so most of my go-to treats leave someone out. Enter these mouthwatering, crackly-topped, fudgy cookies, which happen, by my old co-worker's definition, to be totally "fun-free." No dairy, no gluten, no flour at all in fact. No need: the sugar, cocoa and egg whites around which they're built contain none of those things.

My sister's been making this one where she works, and scrawled down the recipe for me. As long as I leave the nuts out, this addresses all of the dietary restrictions I face at school, without any weird ingredient replacements. Even better, it is an incredibly simple recipe. A little Googling tracks this recipe back to one by François Payard in Gourmet's April 2002 issue, as digitized by Molly Wizenburg at Orangette, though I'm not sure where specifically my sister got hold of it. Wizenburg calls them "Featherweight Cookies"; a very similar recipe circulates as "Chocolate Puddle Cookies." I'm going with "Magic Cookies" because they are pretty damn magical. Besides, who needs "fun" when you have magic?

    Chocolate Magic Cookies

    gluten-free, dairy-free, nuts optional
    25 minutes, start to finish, makes about 32 three-inch cookies

    Dry Mix:

  • 3 cups (12 oz) confectioner's sugar
  • ¾ c. cocoa powder
  • ¼ tsp. salt
  • 2 c. mix-ins (toasted nuts, chocolate chips, cacao nibs, etc)

  • Wet mix

  • 4 large egg whites (~1/2 cup), preferably at room temperature
  • 1 tsp. vanilla
Preheat oven to 350°. Mix dry ingredients together until well blended. Separate eggs and add vanilla. Add egg and vanilla to dry mix and stir until well-blended. Scoop about a tablespoon at a time onto parchment-lined sheet pans with plenty of room to spread (which they will start to do immediately) and bake for 12-15 minutes, or until cookies are puffed up and cracked on top. It possibly goes without saying that to keep these gluten and dairy free, your mix-ins must also be, and that label reading is up to you (especially on chocolate chips!). You also may not care. I actually wonder how salted pretzel bits would work in here.

LinkWithin

Related Posts Plugin for WordPress, Blogger...